What is Angular
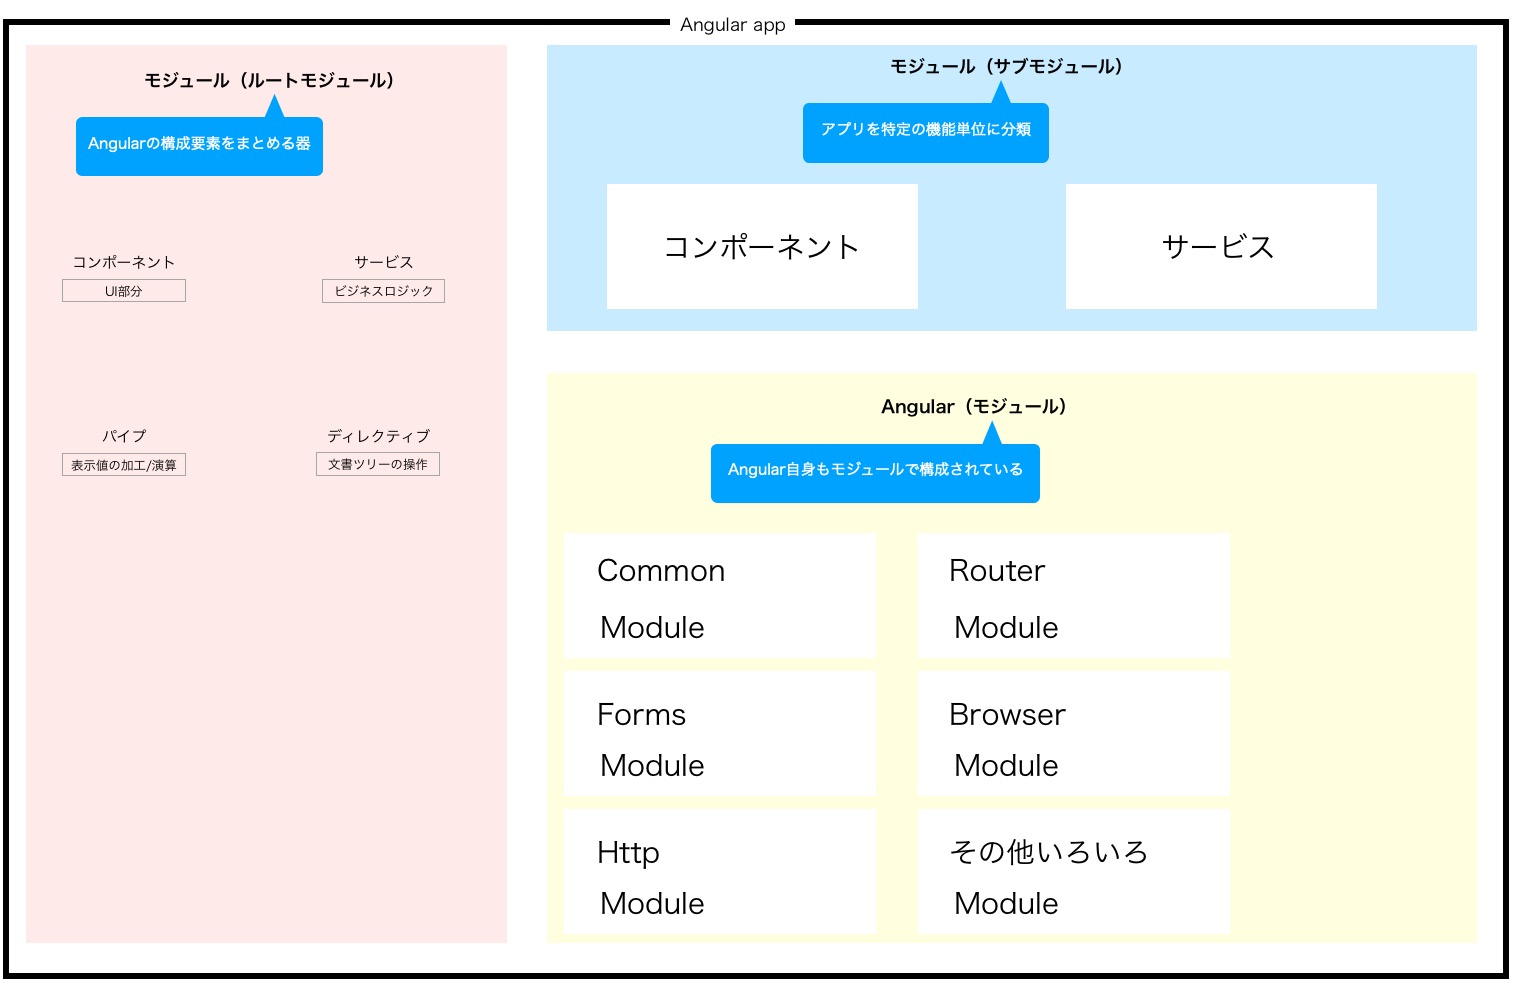
Angular Modules
Angular itself is composed of multiple modules (components), and you import and use the necessary modules according to your application requirements. As a rule, an Angular application must be composed of one or more modules.
Example:
// Import available modules
// @angular are modules provided by Angular as standard
import { NgModule }      from '@angular/core';
// BrowserModule is a module that allows the application to run in a browser
import { BrowserModule } from '@angular/platform-browser';

import { AppComponent }  from './app.component';

// NgModule is a module used to define modules
@NgModule({
  imports:      [ BrowserModule ],
  declarations: [ AppComponent ],
  bootstrap:    [ AppComponent ]
})
// The actual implementation of a module in Angular is a TypeScript class.
// Using export to make AppModule available to other modules.
export class AppModule { }
Define a class with export class AppModule { } → Declare module information with @NgModule decorator.
Main Parameters of the @NgModule Decorator
Understanding how to use the @NgModule decorator is important!
| Parameter Name | Overview |
|---|---|
| imports | Other modules to be used in the current module |
| exports | Components, etc. to be exposed externally from the current module |
| declarations | Components, etc. that belong to the current module |
| bootstrap | The top-level component that should be launched first in the application (= root component) |
| id | The id value of the module |
Main Parameters of the @Component Decorator
| Parameter Name | Overview |
|---|---|
| selector | Selector expression that represents the element to which the component should be applied |
| template | View (template) to be applied to the component |
Example:
@Component({
  selector: 'my-app',
  template: `
    <table class="table">
      <tr>
        <th>ISBN Code</th><th>Title</th><th>Price</th><th>Publisher</th>
      </tr>
      <tr *ngFor="let b of books">
        <td>{{b.isbn}}</td>
        <td>{{b.title}}</td>
        <td>{{b.price}}円</td>
        <td>{{b.publisher}}円</td>
      </tr>
    </table>
  `,
})
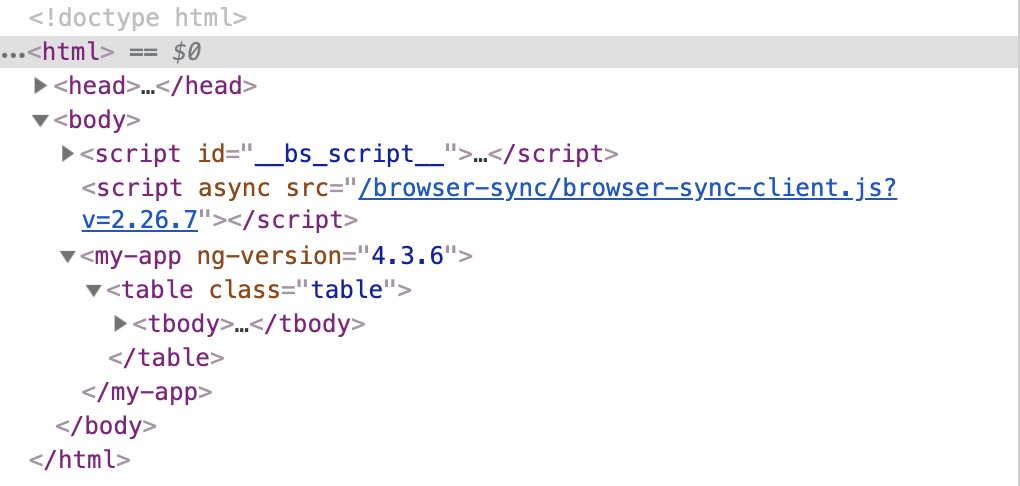
The template <table class="table"> is applied to the <my-app> element. It’s like the render method in Rails.
When actually viewed in developer tools, it looks like this:
Angular Class Naming Conventions
| Type | Naming Convention | Example |
|---|---|---|
| Class Name | “Name+Type” UpperCamelCase notation | AppModule, FriendListComponent |
| File Name | “name.type.ts” KebabCase notation | app.module.ts, friend-list.component.ts |
| Test Script | Add “.spec.ts” to the target file name | friend-list.component.spec.ts |
Angular Data Binding Syntax
| Mode | Description | Notation |
|---|---|---|
| Component→View | Interpolation | {{…}} |
| Component→View | Property/Attribute Binding | [property]=“value” |
| View→Component | Event Binding | (event)=“handler” |
| Component→View | Two-way Binding | [(target)]=“value” |
Angular data binding notation varies depending on the binding method.
Parent-Child Data Exchange
@Input Decorator
Used to pass values from a parent component to a child component.
Syntax

@Input() prop: type
-----------------------

- prop: Property name

- type: Data type
Example) From parent to child: Parent passes item to child
// AppComPonent (Parent)

selected: Book;
<detail-book [item]="selected"></detail-book>
Binding the value of the selected property to the item attribute
DetailsComponet (Child)
// Receive the item attribute
// DetailsComponet (Child)

@Input() item: Book;
Properties with @Input can receive values from outside
@Output Decorator
Used to pass values from a child component to a parent component.
In the example, the edited event declares that it passes a $event object of type Book when the event occurs.
Syntax

@Output() event = new EventEmitter<type>();
-----------------------

- event: Event name

- type: Data type to be passed as $event object

Example:

export class EditComponent {
  @Input() item: Book;
  @Output() edited = new EventEmitter<Book>();

  onsubmit() {
    this.edited.emit(this.item);
  }
}
The @Output decorator only declares the event name and type, so to actually trigger the event, use the emit method.
In the example, the emit method is called in the onsubmit method to pass the edited book information (this.item).
Note: The data argument must match the type in EventEmitter<type>.
Syntax

this.event.emit(data)
-----------------------

- event: Event name

- data: Data to be passed as $event object

Example:

export class EditComponent {
  @Input() item: Book;
  @Output() edited = new EventEmitter<Book>();

  onsubmit() {
    this.edited.emit(this.item);
  }
}
Example) Passing values from child to parent
AppComPonent (Parent)
// AppComPonent (Parent)

onedited(book: Book) {...}
<edit-book ... (edited)="onedited($event)">
DetailsComponet (Child)
// DetailsComponet (Child)

@Output() edited= new EventEmitter<Book>();
Component Lifecycle
For details, see official Angular.
As a reminder:
- Concentrate component initialization processing in the
ngOnlnit method
Services
Components focus on interacting with the view, delegating application-specific business logic to services.
To use a service class, add the @injectable decorator before the standard class definition. This @injectable decorator means that the service can be injected into components.
To register a service, list the target classes in the providers parameter of the @NgModule decorator.
Terminology
Decorator
A mechanism for attaching configuration information to classes, properties/methods, arguments, etc.
Root Module
A module that is called at startup.
UpperCamelCase Notation
All characters, including the first, have capitalized word boundaries.
LowerCamelCase Notation
Only the first character is lowercase
KebabCase Notation
All lowercase with hyphens as word separators.
Directive
Supplementary information given to the compiler at compile time.
In Angular, you set the ngModel directive to the #name variable as follows. This will inform you of errors during compilation.
#name="ngModel"