Setting up a Sass Environment and Simplifying HTML Common Parts as Easily as Possible
When creating a serverless application without a framework, my biggest challenges were setting up Sass and standardizing HTML components.
There are various convenient front-end tools like webpack and gulp.js, but they have issues such as lack of maintenance or being overly complex. I could just read the documentation, but that’s troublesome.
My first requirement was something simpler than a framework, allowing for easy Sass setup while not being at the mercy of tool updates. In terms of scale, I was implementing a serverless solution with fewer than 50 pages and simple functionality. To minimize maintenance, I decided against using frameworks. The goal was to keep everything as simple as possible.
Initially, I considered using webpack or gulp.js, but decided against them for the following reasons:
- gulp.js → Not well-maintained; requires learning gulp.js specifications for more complex tasks
- Grunt → Abandoned for the same reasons as gulp.js
- webpack → Likely to become the mainstream choice, but too feature-rich and has a steep learning curve. If I were to choose one, it would probably be this, as many frameworks adopt it
- parcel → The simplest among these options, but I didn’t want to be dependent on a tool
- Implementing scripts myself by copying trendy front-end engineers → I figured if I was going to go that far, I might as well use a static generator like
nuxt.js
Tools Used
- pug → For standardizing HTML
- node-sass → For compiling Sass
- npm scripts → For automating Sass compilation
- bash → For semi-automating pug builds
- Live Server → VS Code extension that auto-reloads when HTML or CSS changes
Installing pug
You’ll need node, so install it if you haven’t already.
Installation instructions are available on the official site.
Installing pug:
$ npm install -D pug
In my case, I prefer not to install globally, so I install locally.
$ npm install -D pug-cli
Verify that it’s installed correctly:
$ npx pug --help
Creating Common Layouts
For parts you want to make into partial templates, include _ in the name. For basic setup, it might look something like this:
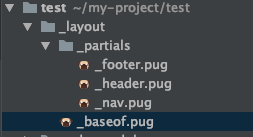
Common parts like head and meta are described in _baseof.pug within the _layout folder.
I put footer and header in the _partials folder.
Since footer and header will be included in baseof.pug, let’s build baseof.pug:
//- Page settings
block pagedata

doctype html
html(lang="ja")
    head
        meta(charset="utf-8")
        meta(http-equiv="X-UA-Compatible" content="IE=edge")
        meta(name="viewport" content="width=device-width, initial-scale=1.0")
        link(href="https://fonts.googleapis.com/css?family=Roboto:300,400,500" rel="stylesheet")
        title #{pageTitle} | Sample Homepage

        block pagecss

    body.page
        div.container
            include ./_partials/_nav
            div.main-box
                include ./_partials/_header
                block main
            include ./_partials/_footer
    block pagejs
With this, the common layout part is complete.
Creating Individual Pages
You can create individual pages anywhere, but for this test, I’ll create a sample folder directly under the directory and create index.pug inside it, including the baseof.pug we just created.
//- Load template
extend ../_layout/_baseof

//- Page-specific settings
append pagedata
    - var pageTitle= "Top Page";

//- Page-specific CSS
append pagecss
    link(rel="stylesheet" href="../assets/css/style.css")

//- Page-specific JS
append pagejs
    script(src="../assets/js/index.js")

//- Page content
block main
    div.content
        div.page-item
            h1 Top Page Content
As you can see from the code, it’s simply including baseof.pug and then writing individual content, js, and css.
Building
When built, pug files output plain HTML. However, it’s tedious to run the build command for each file, so I’ll create a sh file to build them all at once. Here, I’ll create build_pug.sh:
#!/bin/sh
#
# Sample
#
npx pug sample/index.pug --pretty --out public/sample
In my case, since I haven’t installed pug cli locally, I’m using the npx command. This command builds the index.pug in the sample folder and outputs it to the sample folder in the public folder. Note that you should create the public and sample folders beforehand.
Once created, build it:
$ sh build_pug.sh
When built, it will output something like this to public/sample:
<!DOCTYPE html>
<html lang="ja">
  <head>
    <meta charset="utf-8">
    <meta http-equiv="X-UA-Compatible" content="IE=edge">
    <meta name="viewport" content="width=device-width, initial-scale=1.0">
    <link href="https://fonts.googleapis.com/css?family=Roboto:300,400,500" rel="stylesheet">
    <title>Top Page | Sample Homepage</title>
    <link rel="stylesheet" href="../assets/css/style.css">
  </head>
  <body class="page">
    <div class="container">
      <nav class="nav"><span>This is nav</span></nav>
      <div class="main-box">
        <header class="header"><span>This is header</span></header>
        <div class="content">
          <div class="page-item">
            <h1>Top Page Content</h1>
          </div>
        </div>
      </div>
      <footer class="footer"><span>This is footer</span></footer>
    </div>
  </body>
  <script src="../assets/js/index.js"></script>
</html>
Creating .gitignore file
Make sure not to include node_modules and files that change with each build in git:
/node_modules/
/public/top/
Compiling Sass using node-sass
Install node-sass for automatic Sass compilation:
$ npm i node-sass -D
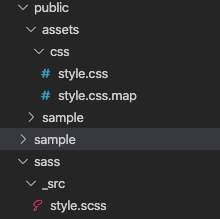
You can organize your folders however you want, but in my case, I’ve organized them as follows. The compiled sass is stored in the assets/css folder within the public folder.
Let’s try running the node-sass command. Execute the following command in the terminal:
$ npx node-sass sass/_src/style.scss --output public/assets/css/ --output-style compressed
You should now have compressed CSS compiled from Sass stored in the public/assets/css/ directory.
Now let’s use npm scripts to automatically compile Sass whenever it’s changed.
Add the previous command to the scripts in your package.json:
{
    "scripts": {
        "sass": "npx node-sass sass/_src/style.scss --output public/assets/css/ --output-style compressed"
    }
}
While this works well for production compilation, it’s a bit cumbersome for development, so let’s add a development version called sass-dev:
{
    "scripts": {
        "sass-dev": "npx node-sass sass/_src/style.scss --output public/assets/css/ --output-style compressed --watch --source-map true",
        "sass": "npx node-sass sass/_src/style.scss --output public/assets/css/ --output-style compressed"
    }
}
We’re using watch to detect Sass changes and source-map to make CSS debugging easier. Now let’s run the command. Execute the following in the terminal:
$ npm run sass-dev
You should see that it properly detects and compiles Sass when changes are made.
I recommend using sass-dev during development and sass when deploying to production.
Summary
While it’s a bit tedious to build HTML multiple times, this isn’t a major issue for serverless projects where js implementation tends to be more prevalent than HTML. You could also automate compilation with bash if you’re motivated.
If you have more HTML-heavy pages, you might want to consider using a static site generator. For a small number of pages, typically managed by one person, it’s convenient to create templates without unnecessary tools and manage them with git for reuse whenever needed.