Understanding the Angular Tutorial Step by Step ①
I had tried the Angular tutorial before, but at that time I didn’t really understand TypeScript, and I had only developed with Rails, so I didn’t have much JavaScript knowledge either. As a result, I couldn’t understand Angular at all.
However, these days I’m mostly doing frontend development, so I should be able to understand Angular better than before. So, I’m going to give the Angular tutorial another serious try.
As a prerequisite, I think TypeScript is essential. You don’t have to understand it in detail, but you should at least read through a book to get the basics. I also tried the tutorial after deepening my TypeScript knowledge, and I felt my understanding improved a lot.
Environment
- node.js
- v12.15.0
- Angular
- @angular-devkit/architect 0.1000.1
- @angular-devkit/core 10.0.1
- @angular-devkit/schematics 10.0.1
- @angular/cli 10.0.1
- @schematics/angular 10.0.1
- @schematics/update 0.1000.1
- rxjs 6.5.5
Hero Editor
If you proceed with the tutorial without understanding TypeScript, you’ll get confused about whether a feature is from Angular or TypeScript. So, if possible, it’s better to do the tutorial after learning TypeScript. At the very least, you should know the following, as they appear right from the start.
In the Hero Editor section, the first thing that might confuse you is the decorator function.
The official docs just briefly mention it, so it’s easy to skip over, but it’s important to understand what a decorator function is.
@Component is a decorator function that specifies Angular metadata for a component.
@Component({
  selector: 'app-heroes',
  templateUrl: './heroes.component.html',
  styleUrls: ['./heroes.component.css']
})
This decorator is a TypeScript feature. It’s widely used in frameworks like Angular. The decorator itself is essentially just a function.
As the name suggests, a decorator “decorates” or annotates a class. The reason Angular uses decorators is to make development easier. By creating a @Component decorator, you can apply it to various classes and simply swap out the contents of selector and templateUrl. So, when you see a decorator in front of a class, you can initially understand it as a convenient tool that provides some common functionality.
The next confusing element might be the constructor function. The constructor function is executed when an object is created based on the HeroesComponent class. In other words, it handles initialization. This constructor function can also accept values.
export class HeroesComponent implements OnInit {
	constructor() { }

	ngOnInit() {}
}
Another potential point of confusion is implements. The implements keyword is used to apply the conditions of an Interface to a class. Essentially, it’s about using both a class and an Interface simultaneously.
To understand this, you need to know what an Interface is. Simply put, an Interface defines the “type” of an object.
In this case, the HeroesComponent class uses implements to adopt the type conditions of OnInit.
The OnInit is one of Angular’s lifecycle hooks, and its purpose is initialization.
While both constructor function and OnInit deal with initialization, they do so at different stages:
- The constructor function runs first.
- Then,
OnInitexecutes.
Use the constructor function when you need to pass values to the HeroesComponent class to create an object. For other cases, like handling user interactions such as clicks, use OnInit.
By the way, the ngOnInit method is where you should place the initialization logic that depends on the component’s input properties, which are set by Angular before ngOnInit is called.
Since the basic and重要な concepts of Angular appear from the first half of the tutorial, you need to have a certain level of understanding from the beginning.
Creating Feature Components
The key points in this section are @Input() and property binding.
If you proceed with a half-hearted understanding of this simple parent-child relationship, you will find yourself repeatedly reviewing the documentation later, so be careful.
By passing this @Input decorator to a property, the child HeroDetailComponent can receive values from the parent HeroesComponent.
@Input() hero: Hero;
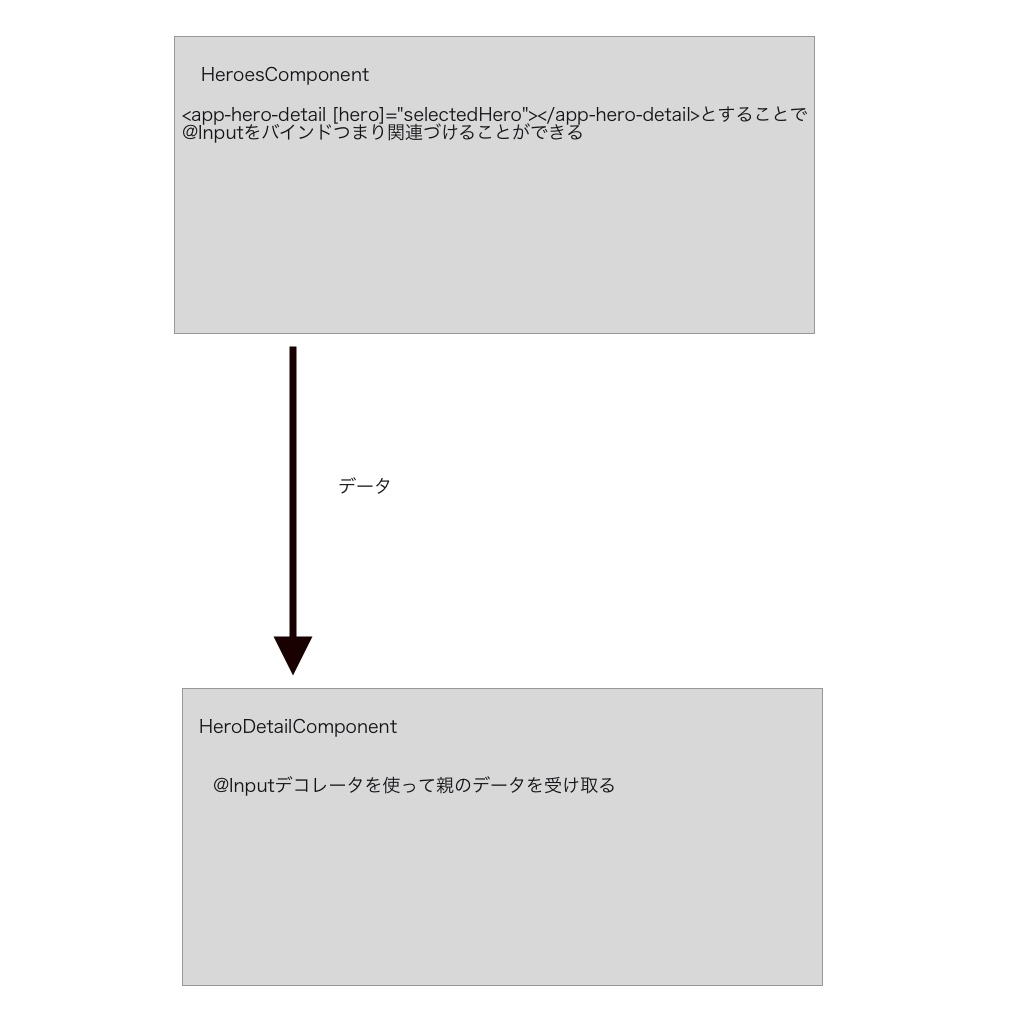
Then, in order to bind the hero property in the parent HeroesComponent, Angular’s property binding is used.
<app-hero-detail [hero]="selectedHero"></app-hero-detail>