What is AWS CloudFormation?
Introduction
I started using AWS CloudFormation for work, and it was quite a struggle.
The hardest part was the lack of information. Sure, there’s official documentation, but it’s not very beginner-friendly for AWS or programming in general.
And if you google “how to use AWS CloudFormation”, most of the results are SEO articles for beginners or YouTube videos, which aren’t very useful for real work. Most of the info is about clicking around in the AWS console.
In real work, you rarely use the console for CloudFormation. Even as a beginner, you can get by with the official tutorial, so you won’t get stuck there.
The real problem is how to actually template and develop with CloudFormation in real projects.
Even if you find a useful article, it’s often written by a pretty advanced engineer, so it skips over the basics. There’s often a lack of step-by-step info.
In my experience, it’s like this: there’s a lot of info for total beginners and a lot for advanced microservices/cloud developers, but not much in between.

This polarization.
So, there isn’t much info at the intermediate level.
That’s why I decided to write an article about AWS CloudFormation at just the right level.
Essential Commands to Remember
When using AWS CloudFormation for work, you mostly operate from the terminal, so you rely on the AWS CLI Command Reference (cloudformation). There are a lot of commands, so here I’ll list the essential commands you should remember.
- create-stack
- update-stack
- delete-stack
- package
- deploy
For details, check the official reference, but here’s a rough image of these commands:
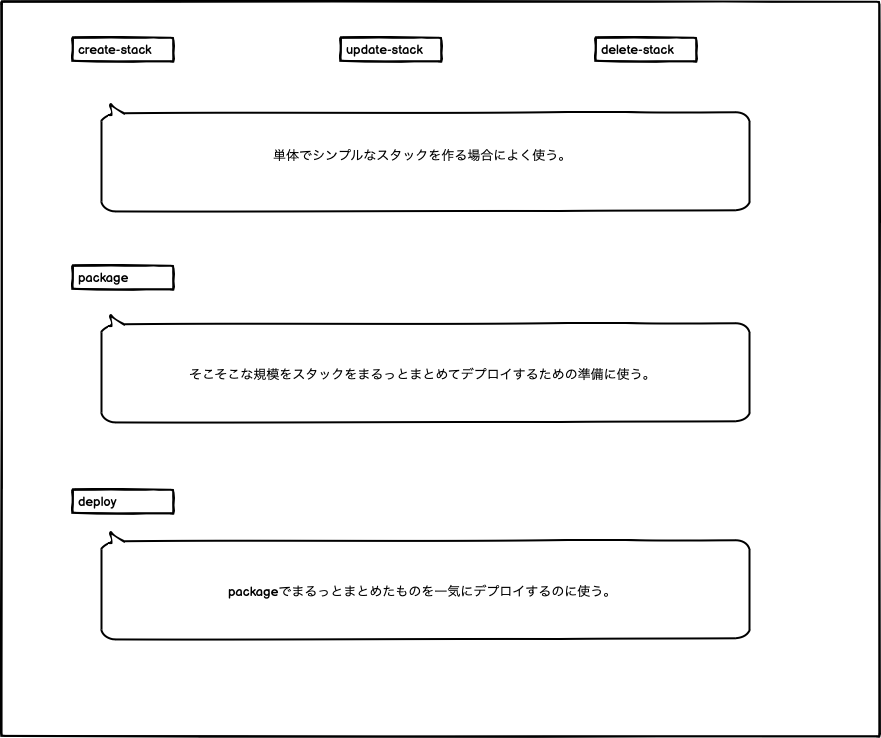
The package and deploy commands have some nuances, like stack nesting and dependencies, so I won’t cover them this time. Maybe next time, I’ll write about it.
First, let’s cover the basics: create-stack, update-stack, and delete-stack. The names are pretty self-explanatory; you use them to create, update, and delete stacks.
The question is, how do you template your stacks effectively using these commands? The key is to use mature technologies to make the process easier and more efficient.
Mature Technologies
You might wonder why, when using cutting-edge technology like AWS, we’d rely on mature technologies. The reason is that the tasks we automate with CloudFormation are often repetitive and long-term.
These are tasks you’ll be doing not just today, but also a year, three years, or even ten years down the line. Using a technology that requires constant updates for something so stable doesn’t make much sense. After all, CloudFormation templates are just YAML files.
A lot of the reference templates for CloudFormation can be found in AWS Labs, and they often use Makefile to manage the setup.
Creating a stack is rarely a one-and-done deal. You’ll probably find yourself repeatedly creating, updating, and deleting resources like IAM policies and access controls. The irony is that the work you do to automate your tasks isn’t automated itself.
So, we’ll use some mature technologies to help us manage our CloudFormation templates.
Creating a Stack with CloudFormation
For this example, let’s create a simple stack that provisions an S3 bucket. Here’s how we’ll structure our directories:
.
├── Makefile
└── stack
    └── s3.yml
    └── parameters.json
First, we’ll create a simple s3.yml file to define our bucket. The key here is the Service variable. It’ll be convenient to have a common variable for all commands related to this stack, so we’ll template it this way.
For details on using !Ref and !Sub, check the official documentation.
AWSTemplateFormatVersion: 2010-09-09
Parameters:
  Service:
    Type: String
Resources:
  S3Bucket:
    Type: AWS::S3::Bucket
    DeletionPolicy: Delete
    Properties:
      BucketName: !Sub
        - ${ Name }-bucket
        - { Name: !Ref Service }
      PublicAccessBlockConfiguration:
        BlockPublicAcls: true
        BlockPublicPolicy: true
        IgnorePublicAcls: true
        RestrictPublicBuckets: true
The Service variable for S3 will be managed in a separate file, parameters.json.
[
  {
    "ParameterKey": "Service",
    "ParameterValue": "bokunonikki"
  }
]
Next, we’ll set up our Makefile like so. Here, the stack name is sample, and we’ll store it in a variable so we can easily reuse the template.
# Variables
STACKNAME := sample

# Stack

## Create S3 Stack
.PHONY: create-s3
create-s3:
	@aws cloudformation create-stack --stack-name ${STACKNAME} \
		--template-body file://stack/s3.yaml \
		--parameters file://stack/parameters.json

## Update S3 Stack
.PHONY: update-s3
update-s3:
	@aws cloudformation update-stack --stack-name ${STACKNAME} \
		--template-body file://stack/s3.yaml
		--parameters file://stack/parameters.json

## Delete S3 Stack
.PHONY: delete-s3
delete-s3:
	@aws cloudformation delete-stack --stack-name ${STACKNAME}
At this point, you can create the stack by simply running make create-s3 in your terminal.
If you go to the CloudFormation section in the AWS console, you should see your stack created, and an S3 bucket named bokunonikki-bucket should be available.
From here, it’s just a matter of iterating until you get the stack just right. The official documentation will be your best friend here.
If you need to change the S3 policy, just run make update-s3. If you accidentally create the wrong stack, make delete-s3 will remove it. Do note that you can’t rename an S3 bucket after creation, so if you mess up the name, you’ll have to delete it and create a new one.
This sample is just a starting point. Once you understand these basics, you can mix and match options to create more complex setups.
By effectively using mature technologies and mastering the CLI options, you’ll be able to create some really neat templates.
Recommended Reading
This book on Make is pretty much all you need. Even if you just use it as a reference, it’s incredibly helpful.

I found this book about Gunpei Yokoi, the man who helped make Nintendo a global gaming powerhouse, really interesting. It talks about how he used mature technologies to reduce manufacturing costs while still providing new experiences to users.
Interestingly, I’ve heard that Apple also opts for stable, if slightly outdated, technologies over the latest and greatest. So never underestimate the power of mature technologies.