Creating Nested Stacks with CloudFormation
Prerequisite Knowledge
If you don’t really understand terms like stack or nested stack, you probably don’t have a good grasp of CloudFormation yet, so please refer to this first:
Overview of Nested Stacks
With CloudFormation, you can create separate stacks like stack A, stack B, and stack C, and then combine them into a single architecture. To reference stack B from stack A, you use the Import and Outputs functions, but as the number of stacks grows, managing these references becomes a real hassle.
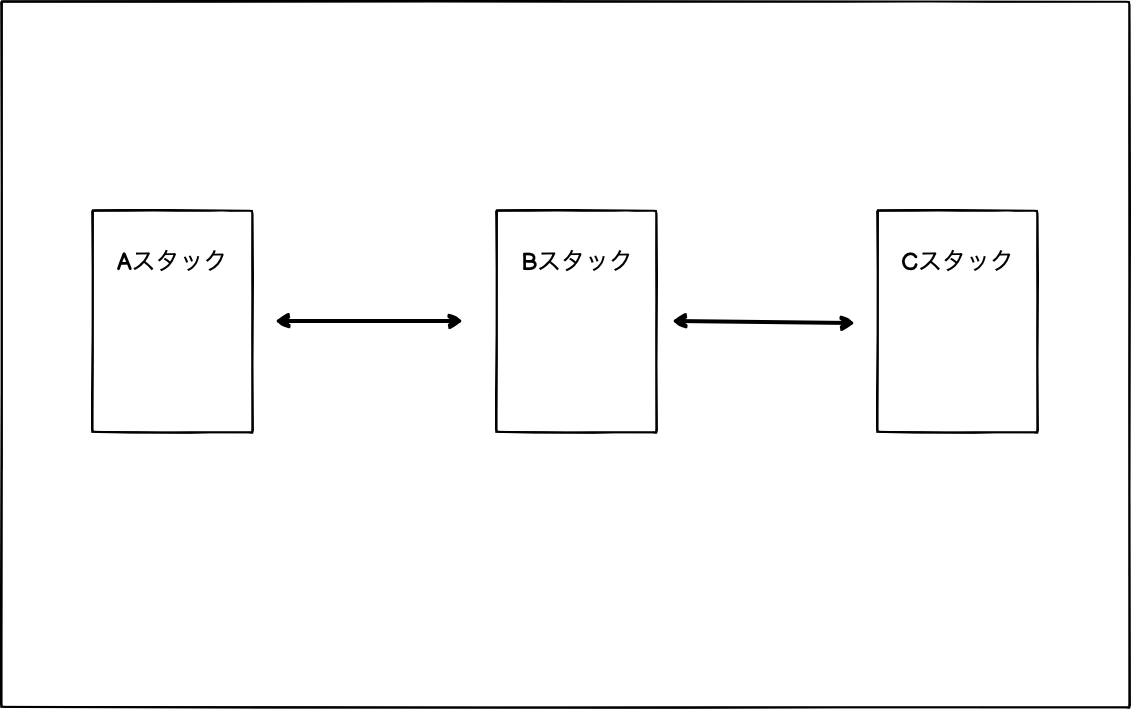
This is especially true when stacks reference each other. For example, stack A references values from stack B, and stack B also references values from stack A. In such cases, you need to use wait and other techniques to control the creation order of the stacks.
Also, deleting stacks with mutual references is a pain. You have to first remove the reference from stack A, then update stack B, delete stack A, and finally delete stack B. It’s a hassle.
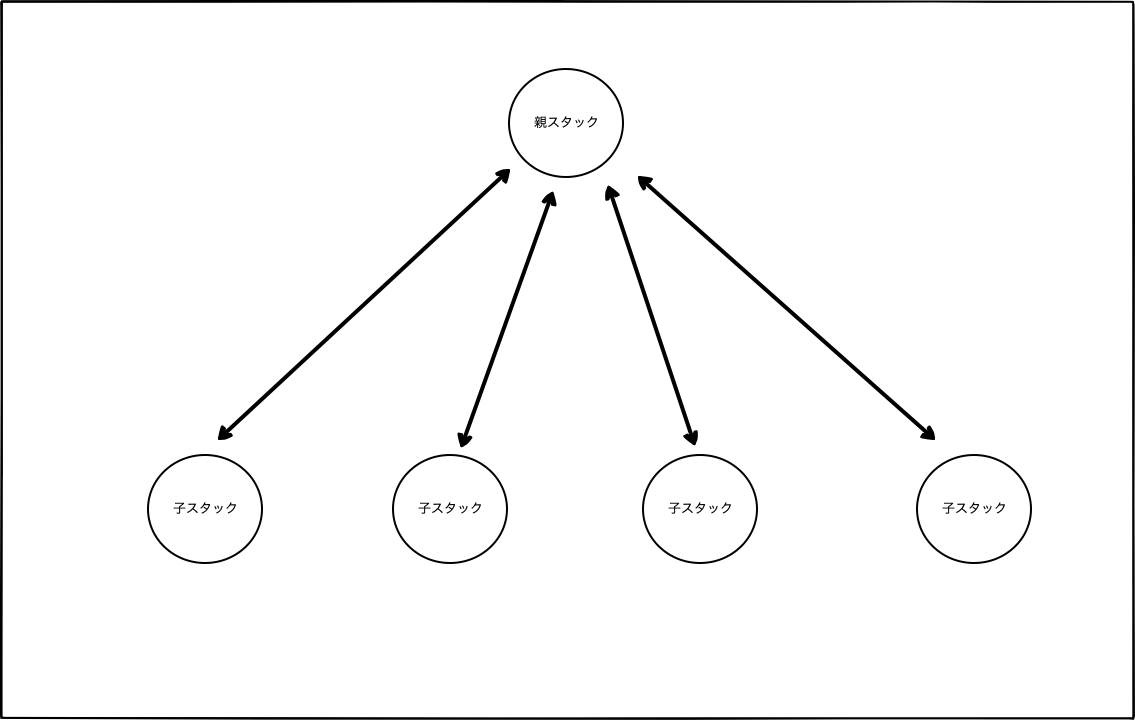
At this point, you’ll want to combine everything into a single stack. That’s where nested stacks come in.
You create child stacks under a parent stack, and when you create the parent stack, all the child stacks are created together. When deleting, you can delete all the child stacks at once by deleting the parent stack.
Directory Structure
First, I’ll explain the directory structure. Honestly, everyone does it differently, so just use this as a reference.
.
├── Makefile
└── nested-stack
    ├── architect-bucket
    │   └── s3.yml
    ├── master.yml
    ├── package
    │   └── packaged.yml
    ├── s3-1.yml
    └── s3-2.yml
Makefile
In CloudFormation, you often have to run AWS CLI commands multiple times. It’s really annoying to run such long commands every time.
aws cloudformation create-stack --stack-name myteststack --template-body file://sampletemplate.json --parameters ParameterKey=KeyPairName,ParameterValue=TestKey ParameterKey=SubnetIDs,ParameterValue=SubnetID1\\,SubnetID2
So, you can predefine these commands in a Makefile and then just run make create or something similar.
nested-stack
This folder contains the services to be deployed with CloudFormation. You put the stacks you want to create in this folder.
- master.yml (parent template)
- s3-1.yml (child template)
- s3-2.yml (child template)
architect-bucket
The process of creating nested stacks involves package → deploy. The package command uploads the local templates to S3, so this is for creating the S3 bucket.
You can use the mb command to create the S3 bucket, but it’s up to you.
package
For a proper explanation of the package command, refer to the official documentation. Here, I’ll just give a rough explanation.
The tedious steps required to create nested stacks are as follows:
- Upload child templates to S3
- Check the URL of the uploaded child templates
- Add the URL of the child templates to
Properties.TemplateURLin the parent template
To simplify these cumbersome steps, we use the --s3-bucket option of the package command.
Since the command can get long, we write it in the Makefile. When you run make package, the child templates are uploaded to the s3 bucket, which is architect-bucket in this case.
# Makefile
# package
.PHONY: package
package:
	@aws cloudformation package --template-file ./nested-stack/master.yml \
	--s3-bucket architect-bucket \
	--output-template-file ./nested-stack/package/packaged.yml
Then, the parent template master.yml is transformed into the packaged.yml template with the Properties.TemplateURL pointing to the URLs of the child templates.
 # master.yml
AWSTemplateFormatVersion: 2010-09-09
Description: master
Parameters:
  Name:
    Type: String
Resources:
  S3Bucket1:
    Type: AWS::CloudFormation::Stack
    Properties:
      TemplateURL: ./s3-1.yml ← ローカルの相対パスがS3のURLに変換される
      Parameters:
        Name: !Ref Name
  S3Bucket2:
    Type: AWS::CloudFormation::Stack
    Properties:
      TemplateURL: ./s3-2.yml ← ローカルの相対パスがS3のURLに変換される
      Parameters:
        S3Name1: !GetAtt S3Bucket1.Outputs.OutputS3Name1
This is what the packaged.yml might look like after running the package command:
 # packaged.yml
AWSTemplateFormatVersion: 2010-09-09
Description: master
Parameters:
  Name:
    Type: String
Resources:
  S3Bucket1:
    Type: AWS::CloudFormation::Stack
    Properties:
      https://s3.ap-northeast-1.amazonaws.com/nested-stack/なんちゃらなんちゃら.template
      Parameters:
        Name: !Ref Name
  S3Bucket2:
    Type: AWS::CloudFormation::Stack
    Properties:
      https://s3.ap-northeast-1.amazonaws.com/nested-stack/なんちゃらなんちゃら.template
      Parameters:
        S3Name1: !GetAtt S3Bucket1.Outputs.OutputS3Name1
Now you’re ready to deploy. Use the packaged.yml created earlier and run make deploy.
The deploy command conveniently handles the creation of the parent stack and the nested child stacks.
# Makefile
# deploy
.PHONY: deploy
deploy:
	@aws cloudformation deploy \
	--template-file nested-stack/package/packaged.yml \
	--stack-name nested-stack \
Passing Values from Parent Stack to Nested Child Stacks
To pass values from the parent stack to the nested child stacks, you can set the values in the Makefile and use the --parameter-overrides option with the deploy command.
# Makefile
Name := bokunonikki
# deploy
.PHONY: deploy
deploy:
	@aws cloudformation deploy \
	--template-file nested-stack/package/packaged.yml \
	--stack-name nested-stack \
	--parameter-overrides Name=${Name}
The value of Name is passed to the parent stack first. The master.yml looks like this:
By doing this, you can pass the value from the parent stack to the nested child stack s3-1.yml.
 # master.yml
AWSTemplateFormatVersion: 2010-09-09
Description: master
Parameters:
  Name:
    Type: String
Resources:
  S3Bucket1:
    Type: AWS::CloudFormation::Stack
    Properties:
      TemplateURL: ./s3-1.yml
      Parameters:
        Name: !Ref Name
The s3-1.yml can be set up to receive the value from the parent stack like this. In this case, an S3 bucket named bokunonikki-1 will be created.
AWSTemplateFormatVersion: 2010-09-09
Description: nested-stack-s3-1
Parameters:
  Name:
    Type: String
Resources:
  S3Bucket1:
    Type: AWS::S3::Bucket
    DeletionPolicy: Delete
    Properties:
      BucketName: !Sub
        - ${ Name }-1
        - { Name: !Ref Name }
Passing Values Between Nested Child Stacks
To pass values between nested child stacks, you can use the Outputs function.
For example, to pass a value from Stack A to Stack B, you would first make the value available in Stack A’s outputs:
AWSTemplateFormatVersion: 2010-09-09
Description: nested-stack-s3-1
Parameters:
  Name:
    Type: String
Resources:
  S3Bucket1:
    Type: AWS::S3::Bucket
    DeletionPolicy: Delete
    Properties:
      BucketName: !Sub
        - ${ Name }-1
        - { Name: !Ref Name }
      PublicAccessBlockConfiguration:
        BlockPublicAcls: true
        BlockPublicPolicy: true
        IgnorePublicAcls: true
        RestrictPublicBuckets: true
Outputs:
  OutputS3Name1:
    Value: !Ref S3Bucket1
Then, in Stack B, you would use !GetAtt to reference the output value from Stack A:
AWSTemplateFormatVersion: 2010-09-09
Description: master
Parameters:
  Name:
    Type: String
Resources:
  S3Bucket1:
    Type: AWS::CloudFormation::Stack
    Properties:
      TemplateURL: ./s3-1.yml
      Parameters:
        Name: !Ref Name
  S3Bucket2:
    Type: AWS::CloudFormation::Stack
    Properties:
      TemplateURL: ./s3-2.yml
      Parameters:
        S3Name1: !GetAtt S3Bucket1.Outputs.OutputS3Name1 ← これ
Stack B itself doesn’t need any special configuration. You just set up the Parameters as usual.
AWSTemplateFormatVersion: 2010-09-09
Description: nested-stack-s3-2
Parameters:
  S3Name1:
    Type: String
Resources:
  S3Bucket2:
    Type: AWS::S3::Bucket
    DeletionPolicy: Delete
    Properties:
      BucketName: !Sub
        - ${ S3Name1 }-2
        - { S3Name1: !Ref S3Name1 }
      PublicAccessBlockConfiguration:
        BlockPublicAcls: true
        BlockPublicPolicy: true
        IgnorePublicAcls: true
        RestrictPublicBuckets: true
That’s all. Be careful not to just copy and paste these commands, as they haven’t been tested.
However, with this general knowledge, you should be able to figure things out by referring to the official documentation.
Recommended Books
This book on Make is probably all you need. Even at a basic level, it can be quite helpful.
This book is great for getting a hands-on understanding of AWS services.