Create a self-signed certificate with CFSSL
It’s a convenient era where you can get certificates for free with Let’s Encrypt, but for cases like expired certificates, different key lengths, or different encryption, it’s handy to use a self-signed certificate (an “oreore” certificate in Japanese).
You can use openssl, but the commands are a bit of a hassle, so I decided to use cfssl to create a self-signed certificate.
I thought it would be quick and easy, but certificates are more complicated than I expected, so I’m making a note. Honestly, there are still things I don’t understand, so if you spot a mistake, please let me know m(_ _)m
Install cfssl
You can install cfssl with homebrew.
brew install cfssl
Steps
If you just want to create a server certificate, it’s even easier, but for certificate verification, you might get errors, so you need to follow the proper steps. To create a self-signed certificate, do the following:
- Create a CA certificate
- Create an intermediate CA certificate
- Sign the intermediate CA certificate
- Create the server certificate
Create a CA certificate
To create a CA certificate, run the following command. The folder structure is a bit different for convenience, so adjust as needed. The same goes for the following commands.
cfssl gencert -initca \
./ca-csr.json | \
cfssljson -bare ../certificates/${DOMAIN}/ca
Create ca-csr.json like this:
{
  "CN": "Root CA",
  "key": {
    "algo": "rsa",
    "size": 2048
  },
  "names": [
    {
      "C": "US",
      "ST": "CA",
      "L": "San Francisco"
    }
  ]
}
By default, it’s set to ecdsa, but I want to create it with rsa, so I set algo to rsa.
Create an intermediate CA certificate
Create an intermediate CA certificate based on the root CA certificate. The intermediate CA certificate is created with the signature of the root CA certificate.
cfssl gencert \
-ca ../certificates/${DOMAIN}/ca.pem \
-ca-key ../certificates/${DOMAIN}/ca-key.pem \
-config ./ca-config.json \
-profile intermediate ./intermediate-csr.json | \
cfssljson -bare ../certificates/${DOMAIN}/chain
Specify ca-config.json with -config. Create ca-config.json like this. Here, you specify the certificate’s validity period and the signing profile. is_ca seems to be a flag that indicates whether to receive a signature from the CA certificate.
// ca-config.json
{
  "signing": {
    "default": {
      "expiry": "168h"
    },
    "profiles": {
      "ca": {
        "expiry": "26280h",
        "usages": [
          "cert sign",
          "crl sign"
        ],
        "ca_constraint": {
          "is_ca": true
        }
      },
      "www": {
        "expiry": "8760h",
        "usages": [
          "signing",
          "key encipherment",
          "server auth"
        ]
      },
      "client": {
        "expiry": "8760h",
        "usages": [
          "signing",
          "key encipherment",
          "client auth"
        ]
      },
      "server": {
        "expiry": "8760h",
        "usages": [
          "signing",
          "key encipherment",
          "server auth",
          "client auth"
        ]
      },
      "intermediate": {
        "expiry": "26280h",
        "usages": [
          "signing",
          "cert sign",
          "crl sign",
          "client auth",
          "server auth"
        ],
        "ca_constraint": {
          "is_ca": true
        }
      }
    }
  }
}
Create intermediate-csr.json like this:
// intermediate-csr.json
{
  "CN": "example.net",
  "key": {
    "algo": "rsa",
    "size": 2048
  },
  "names": [
    {
      "C": "US",
      "ST": "CA",
      "L": "San Francisco"
    }
  ]
}
Sign the intermediate CA certificate
Sign the intermediate CA certificate. The intermediate CA certificate is created with the signature of the root CA certificate.
	cfssl sign \
	-ca ../certificates/${DOMAIN}/ca.pem \
	-ca-key ../certificates/${DOMAIN}/ca-key.pem \
	-config ./ca-config.json \
	-profile intermediate ../certificates/${DOMAIN}/chain.csr | \
	cfssljson -bare ../certificates/${DOMAIN}/chain
Create the server certificate
Create the server certificate. The server certificate is created with the signature of the intermediate CA certificate.
cfssl gencert \
	-ca ../certificates/${DOMAIN}/chain.pem \
	-ca-key ../certificates/${DOMAIN}/chain-key.pem \
	-config ./ca-config.json \
	-profile server ./server-csr.json | \
	cfssljson -bare ../certificates/${DOMAIN}/cert
	mv ../certificates/${DOMAIN}/cert-key.pem ../certificates/${DOMAIN}/privkey.pem
Create the server certificate like this:
// server-csr.json
{
  "CN": "example.net",
  "hosts": [
    "example.net",
    "www.example.net"
  ],
  "key": {
    "algo": "rsa",
    "size": 2048
  },
  "names": [
    {
      "C": "US",
      "ST": "CA",
      "L": "San Francisco"
    }
  ]
}
That’s it. I added a command because I wanted it to have the same names as the certificates from Let’s Encrypt, such as cert.pem and privkey.pem.
Doing this made me realize how complex certificates are. So, I created a collection of handy tools related to certificates for future reference.
cert-manager-tools
cert-manager-tools is a collection of scripts and tools that are often used with certificates. It includes scripts for creating certificates using cfssl and certbot for Let’s Encrypt, as well as a certificate verification tool made with the Go language.
let’s encrypt
I have summarized scripts that use certbot to create Let’s Encrypt certificates. These are meant for verification, so they place the certificates in a specified directory. As you can see in the repository, it’s just a script that runs the certbot command, so there’s nothing particularly difficult about it.
Here’s an example of what I created:
.PHONY: create-rsa-cert
create-rsa-cert:
	sudo certbot certonly --manual \
		--server https://acme-v02.api.letsencrypt.org/directory \
		--preferred-challenges dns \
		-m ${EMAIL} \
		-d ${DOMAIN} \
		--agree-tos \
		--key-type rsa \
		--rsa-key-size ${KEY_SIZE} \
		--deploy-hook "./script.sh"
It’s nothing special, but I often get confused about it, so Iまとめておきました. You can’t specify the directory when creating a certificate with Let’s Encrypt, so I’m using script.sh to cover that.
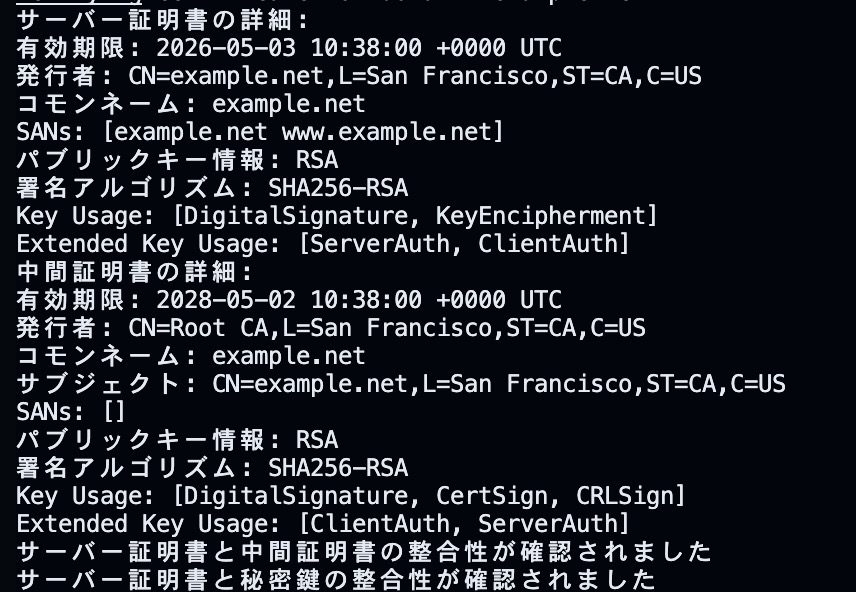
Verification of created certificates
I created a tool to verify the created certificates. Of course, you can verify them with openssl or cfssl, but in actual production environments, openssl and cfssl pose a risk of OS command injection, so I created a tool using a programming language.
So, I used the Go language, which natively supports ssl/tls. It was my first time trying Go, but it’s quite便利ですね. Being a relatively new language, it seems to have many native supports that are useful in today’s world.
So, when you run the following command, it will execute the Go program.
make verify DOMAIN=example.net
Verification will be performed.
Conclusion
Certificates are difficult.
If you just want to issue one, you can easily do it with a cloud service, but if you want to create one yourself, you need to understand the structure of the certificate and the mechanism of signing, which is challenging. Also, many encryption methods have different pronunciations for the same thing, which is confusing.
The validity period of certificates is getting shorter, but I wonder what everyone else is doing. As of May 2025, AWS does not support Organization Validation (OV) or Extended Validation (EV), so if you are using these certificates, you will need some method of automation. Or do people do it manually?
By the way, I was a bit surprised to learn that ACM allows you to register certificates even if their integrity is not guaranteed, and you can renew them with completely different common names. I thought AWS was doing this properly, but it turns out it was quite lenient. So, be careful with certificates, as they can make your site inaccessible.